WIND FOIL | HOW TO TRIM: Rig, Board and Foil | FULL Tutorial
Controlled flight:
It seems like hydrofoil windsurfing can be quite challenging if you don't have the proper setup and technique. Many windsurfers have yet to try foiling, and even those who have may have switched to using a wing instead. That might be why there haven't been as many discussions about foiling lately.
I can understand why some might feel hesitant about trying it out, as it can seem intimidating and require a significant investment in equipment. It can also be difficult to figure out which foil to use and how to adjust your gear properly. However, like when you first started windsurfing, overcoming these challenges can be incredibly rewarding. The right adjustments can make a significant difference in wind foiling, and it's definitely worth the effort.
1. The Rig
It's worth considering using a pure foil sail when wind foiling, as they can be incredibly helpful in maintaining stability. These sails are typically designed with a higher aspect ratio, which reduces the pressure on your back hand and allows you to handle gusts more smoothly. Additionally, the deep profile in the front of the sail provides excellent control and, when combined with the high aspect ratio, helps prevent the nose from lifting too quickly.
Trimming the Rig
The great thing about wind foiling is that you can adjust your windsurf sail to make it more forgiving and quicker. One essential tip is to use a smaller sail than you typically would, as this will give you the most control when you're just starting to catch the wind and lift onto the foil.

To optimize your sail's trim for wind foiling, consider slightly under-downhauling it. Start by using the recommended downhaul tension for your sail, and then release approximately one centimeter of tension. You should also keep the outhaul tension high. Generally, when windsurfing with a fin, you would trim the sail so that it lightly touches the boom as the wind fills it. However, when wind foiling, you want to avoid contact between the sail and the boom. This combination of adjustments generates a larger profile in the front of the sail and reduces backhand pressure, which simulates some of the characteristics of a foil sail.
Length of Harness Lines
To optimize your wind foiling experience, it's recommended to adjust your harness lines by using a longer length than you typically would. This approach provides you with greater range of motion and a more secure feel, while also encouraging you to adopt the proper technique. Specifically, you'll want to keep your hips low to increase tension on the harness lines.
It's worth noting that what constitutes "long" can vary depending on factors such as your arm length, boom width, and skill level. In my personal experience, I typically use harness lines that are approximately six inches longer than what I'd use when windsurfing with a fin.

2. The Board
When wind foiling, it's important to distribute your weight effectively across three points on the board: the back foot, the front foot, and the mast base. These points allow you to transfer pressure from the sail to the board and ultimately the foil.
It's typically recommended to begin with the foot straps and mast base in the middle position to ensure the foil is properly tuned. However, we'll discuss foil tuning in greater detail shortly.
Once you've established a solid foil setup, you can make some adjustments to further optimize your wind foiling experience.
Footstrap Positioning
To gain greater control while wind foiling, many world cup riders opt to set their footstraps further apart. This involves moving the back strap one plug further back and the front strap one plug further forward.
The logic behind this adjustment is quite intuitive. Imagine standing on your board with no wind and then placing your feet a bit further apart. Now imagine bringing your feet very close together. Which way do you think you would maintain balance on the board longer? The answer is clear.
When it comes to mounting your footstraps further apart, the ideal distance depends on your skill level. If you're new to wind foiling, it's best to mount your straps closer to the center of the board to stay balanced. Once you start feeling more comfortable and placing your feet further out on the board, you can begin moving the straps further to the outside. However, keep in mind that mounting your straps further apart will create more leverage on the foil and allow for greater speed, but may also make the ride more unstable.

Mast Base Positioning
The position of the mast base is another key element in achieving the optimal trim of your board in the air. Initially, placing it in the middle is a good starting point. However, if you find that you need to raise the nose of the board after setting up your foil, you can gradually move the mast base closer to your feet. Conversely, if the board is still lifting too much, shifting the mast base slightly towards the front can help to balance it out.
3. The Foil
Now, let's talk about the foil. It consists of several parts: the mast, the fuselage, the front wing, the rear wing or stabilizer, and, hopefully, a set of bolts.
The foil works similarly to an airplane underwater. The asymmetrical front wing creates pressure, pushing the foil up. The rear wing or stabilizer extends far behind, and the further it is back, the more stable your lateral pitch will be.
Setting up the Rear Wing
One important aspect to consider is adjusting the angle of attack on your stabilizer. Generally, the more you bring up the trailing edge of the stabilizer, the more the foil will move up.

It's important to find the right angle that matches your footstrap, foil, and mast base positions. One way to start is by following the manufacturer's suggestions. If you have a mix of brands, you may need to fine-tune it yourself.
Once you're on the water, focus on how the pressure on your legs is distributed. If you're struggling to get the board out of the water, you may need to increase the angle of attack. However, if you can hardly put pressure on the back foot without the foil lifting you into the sky, you may need to decrease it.

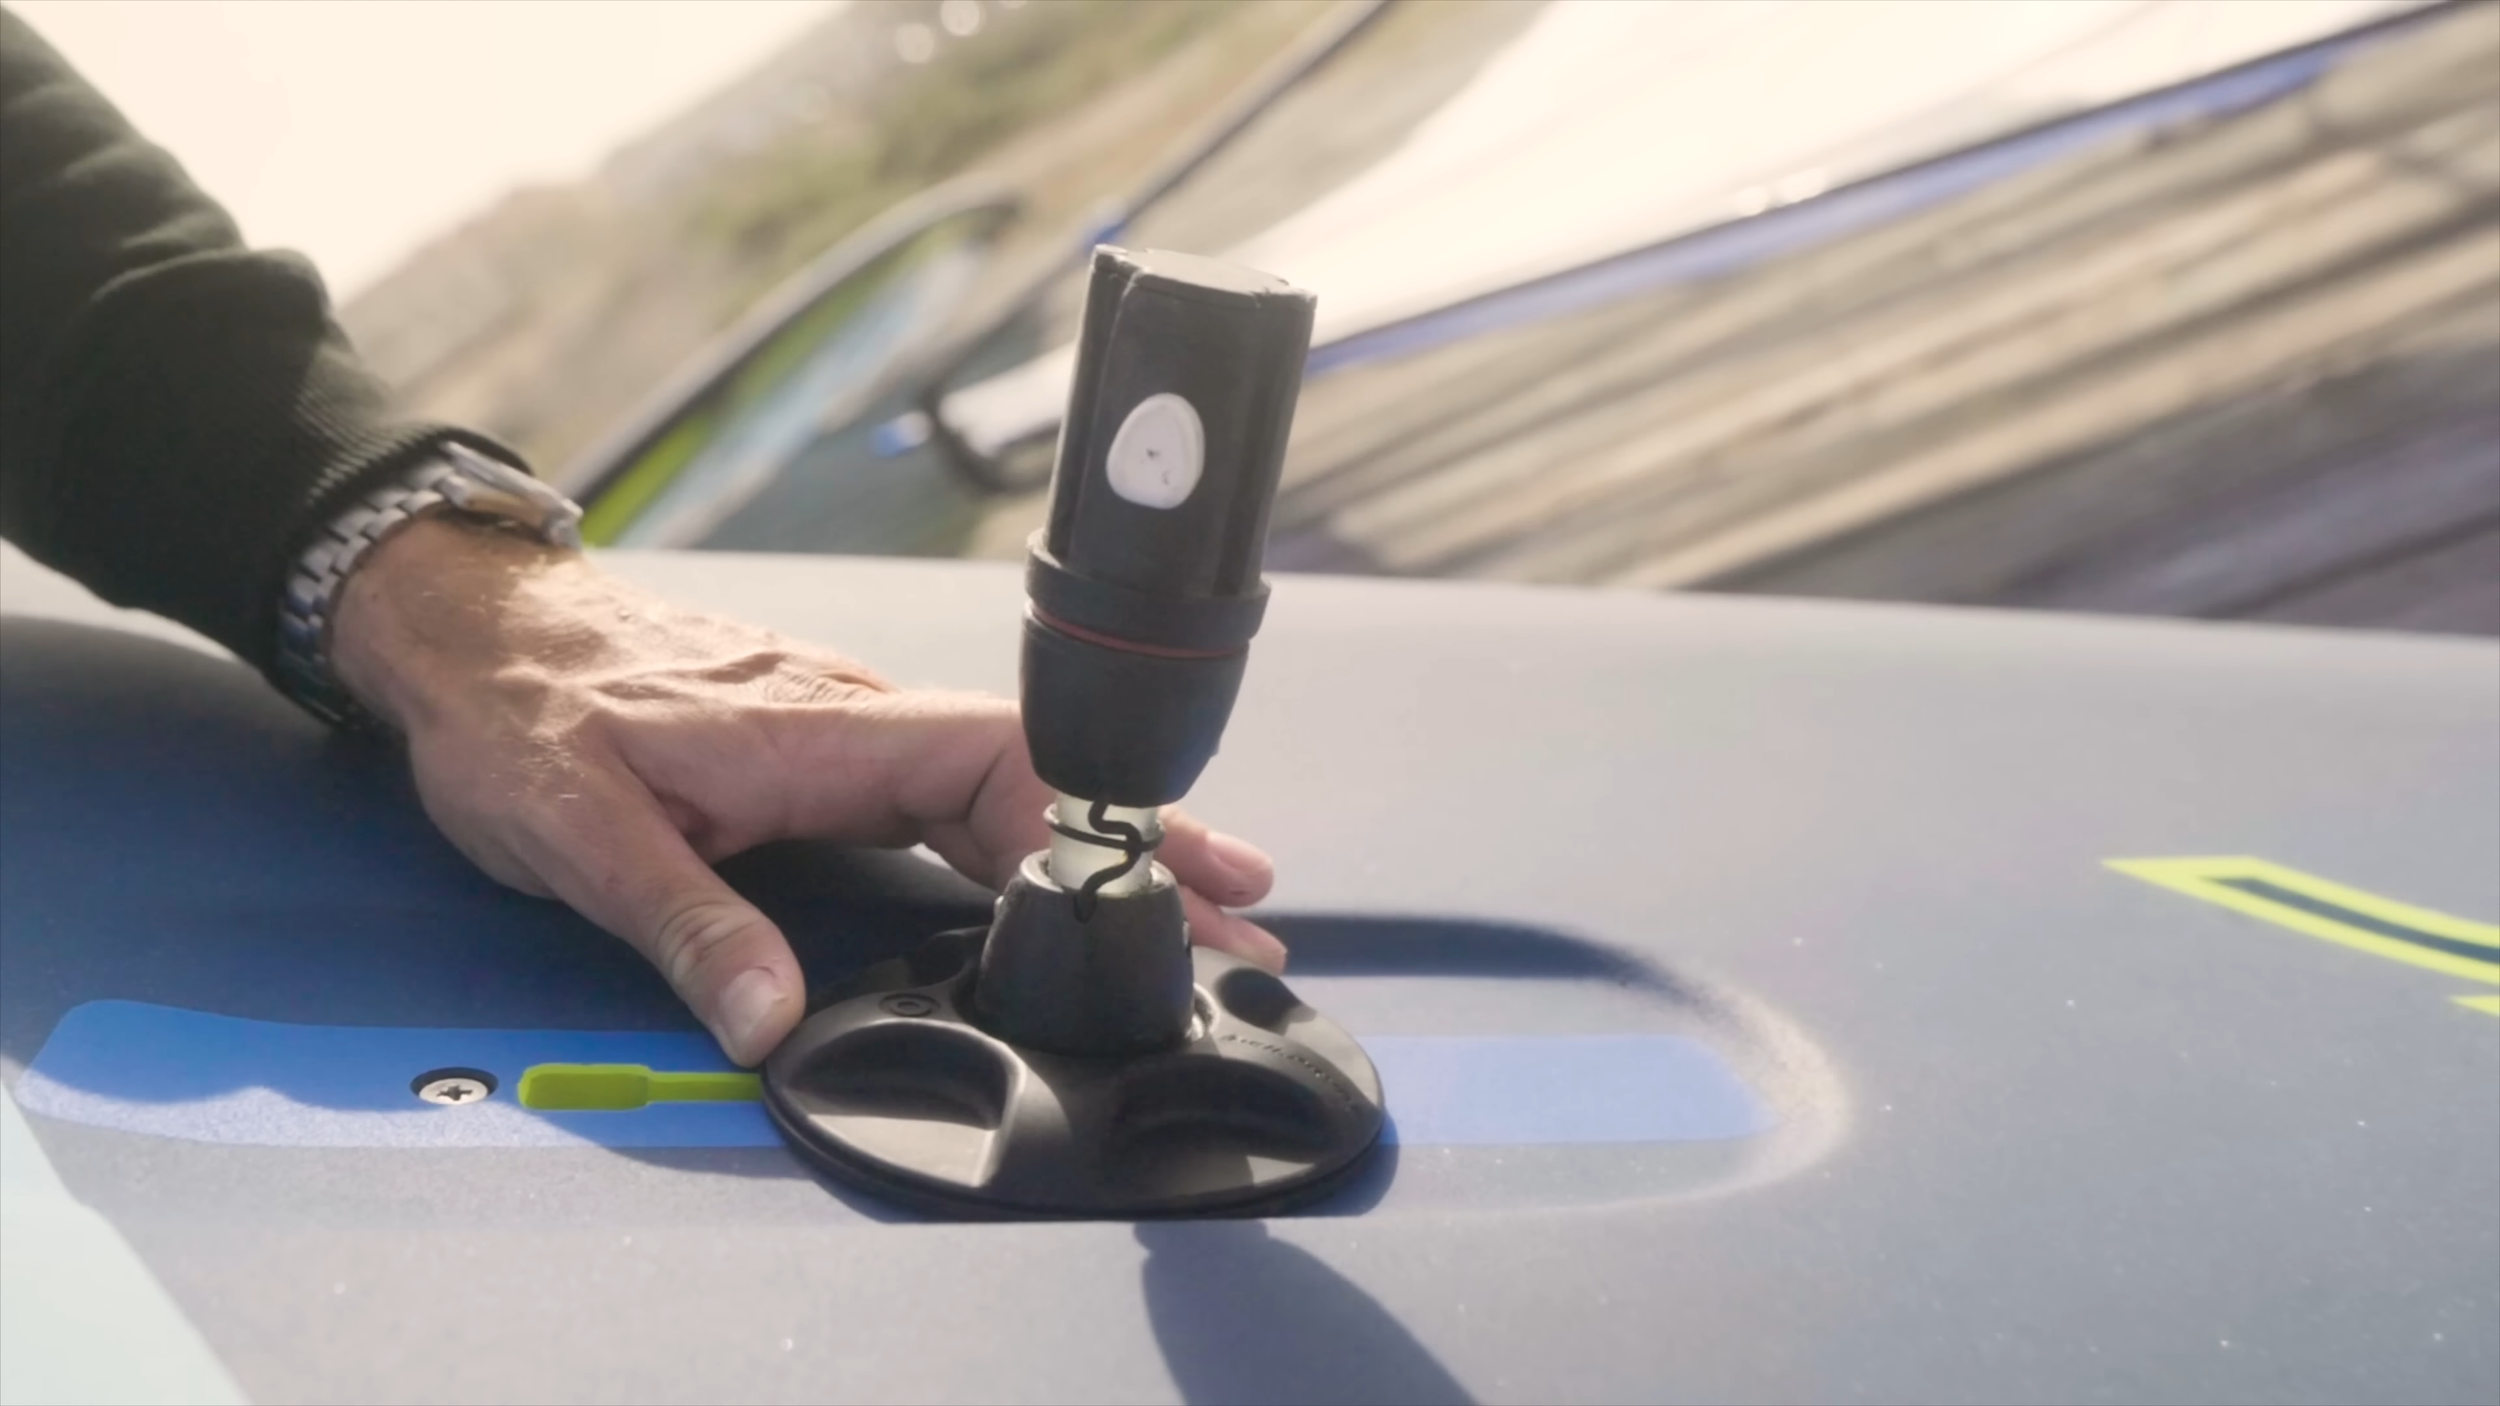
To get the exact angles, you can use a digital pitch gauge to clip on the wing and measure the degrees between the wing and fuselage. Remember to adjust the angle step by step until you find the right balance for your setup.
Raking the Foil Mast
Another important consideration is the rake of your foil mast in relation to the board. Whether or not you can adjust this depends on the type of box system you're using. If you have a double US-Box or a Deep Tuttle Box, you can use washers to change the rake of your foil mast. I'll include a link to these washers in the video description for your convenience.

Increasing the rake can help you achieve a smooth gliding motion through the wind and prevent hard nose-dives. If your nose is pointing down too much, gradually increase the rake by placing washers between the mast and board until the board is parallel with the water. In most cases, you won't need to decrease the rake, but rather increase it to achieve optimal performance.

Conclusion
Congratulations on completing all of these adjustments! I understand that it was a lot of information to take in, but the effort will definitely pay off. Foiling is an experience like no other, much like driving an electric car - you might not have the sound of splashing water, but the feeling of efficiency is truly amazing. Foiling will allow you to have great days on the water even in light winds.
Now it's time to get out there and have some fun on the water!